Drupal 8, Pantheon & GitKraken: Part 3 of 3
Welcome to the third and final installment of our three part Drupal 8, Pantheon & GitKraken series. For more information on what this series will be covering check out our intro HERE.
The first installment of the series can be found HERE. For the second installment click HERE.
OK so now that we have our site all set up on Pantheon, Gitkraken installed and configured, and our remote repo cloned it's time to version control some of our work.
Step 1. Exporting our sites "Active" configuration
When making changes on your Pantheon dev site you are changing the "active" configuration. There are many things we can do to our site to change this but for this example I have created a new view. Once you have made your change the goal is to now take this active configuration, version controll it, and move it into our "staged" configuration:
1. In the admin menu go to Configuration>Configuration Synchronization and click the export tab.
2. With Full Archive selected, export the sites active config.

Step 2. Pull from the remote repo to our local repo
Now that we have our active config exported we want to do a Pull from the remote repo to ensure our local repo is up to date before we change the staged config.
1. In Gitkraken click on the "Pull" icon.

(*note: For this tutorial this step is technically not needed since we know no one has changed our site since we cloned our repo BUT it is very important to always pull before you push)
Step 2. Updating our local Repo's "Staged" Configuration
Now that we have our dev sites active config exported and we have pulled from the remote repo, we need to update our local repos staged config:
1. Extract all the files from the export and place them in the following directory of your local repo: sites\default\config.
Step 3. Stage and Commit our changes locally
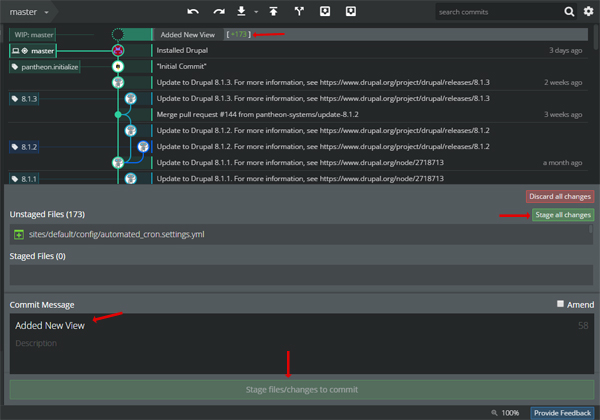
Once we have these files in this directory we should see the changes in Gitkraken. and we can stage and commit them to our local repo.
1. Add a commit message (this is a brief description on what changes were made).
2. Click the Stage all changes button.
3. Click the commit button.

Step 4. "Push" changes committed from our local repo to our remote repo
With our changes staged and committed local we are ready to push
1. Click the push icon in Gitkraken.
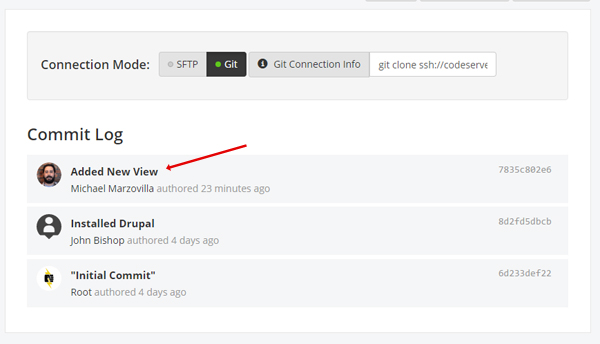
2. Verify that your commit on your Pantheon site.


Congratulations! Your work is now version controlled!!!
Final thoughts:
There is no doubt that a command line workflow is much faster and more efficient, but for me (for now) this is working and allowing me to collaborate with our more experienced developers. Some other benefits of learning some of these tools is I can now use Gitkraken to pull and push to other repos (not just Pantheon). Git branching and the entire repo in general is much more easily visualized which makes understanding the whole process a lot easier.
What's Next?:
So while this is working, having a local developemnt environment integrated in this workflow is ideally how I want to work. I have struggled for some time now fiding the best way to set up a local development environemnt on a windows machine without using any code, the command line, or having to edit a bunch of files on my local system. Just recently (yesterday) I have had much success with Acquia Dev Desktop 2 and plan on sharing how I integrated that into this workflow
I hope others have found this helpful and look forward to sharing more with you.
Cheers!

